
Some time ago, inspired by…
…also known as the “Do not fuck with a hacker’s machine” clip, and the fact I started using Debian exclusively on my netbook, I decided to make preparations in advance for a dire situation in which my laptop is stolen/captured by insurgents, and retrieve it easier or even play a prank on them. These were my postulates:
- I should always know the IP of my netbook, assuming it’s connected to the internet
- If someone other than me is using my computer, he should be well (and discretely) photographed.
- The pictures of people misusing my computer should be quickly and seamlessly transmitted to my server.
Finding the computer#
This part is obvious and was even covered in the Defcon clip – simply using dyn-dns. Which is why we create an account on their website, choose a free domain and set up your computer to report its IP to dyndns’ servers.
taking photos and uploading them to the server#
The idea here is as follows: as soon as the system loads the laptop should take pictures of the user every x seconds, until the user logs on to my account. Otherwise (if user doesn’t log in or uses the especially prepared “guest” account), it takes the pictures until the computer is turned off. After each snapshot the script tries to synchronize the pictures with those already uploaded to the server – just in case the internet connection wasn’t available before.
We’re going to use the fswebcam (also available in debian packages) and rsync programs, and the magic of the /etc/init.d directory.
For our convenience the sript was divided into 4 parts:
nietaki@dblue:~$ sudo touch /etc/init.d/monitoring.sh
nietaki@dblue:~$ mkdir -p ~/.webcam/sav
nietaki@dblue:~$ cd .webcam
nietaki@dblue:~$ touch monitor.sh killer.sh webcontrol.sh
The monitor.sh file contains all the interesting stuff:
As you can see, my server (my_server_host.dyndns.info) has a dedicated “uploader” account, just for receiving the uploaded photos and saving them in the right place. In my case rsync doesn’t need the uploader’s password, because on my server i edited the /home/uploader/.ssh/authorized_keys and added the public key of my laptop’s “nietaki” account. More information on that here. The rest is one infinite loop and parameters for rsync and fswebcam. Additionally you might want to make sure the file mode bits of monitor.sh are set up right, so that only your account can read it, using chmod;)
The killer.sh is there only to enable you to kill the monitor.sh when the time is right:
#!/bin/bash
# killing the monitor
ps aux | grep monitor.sh | grep bash |awk '{print $2}' |xargs kill 2> /dev/null
exit 0
…and I’m almost sure you can do it in a much nicer way;)
Now let’s see /etc/init.d/monitoring.sh
#!/bin/bash
su -c "/home/nietaki/.webcam/webcontrol.sh $1" nietaki &
exit 0
You can see right away this script just invokes webcontrol.sh with the same argument it itself gets, but for added safety, using the “nietaki” account already. I won’t delve into how the /etc/init.d directory works, it’s very well covered in the very same tutorial I have used, the important thing is, using update-rc.d command you can ask the system to run any given file located in /etc/init.d, with the “start” argument during system startup and “stop” during system shutdown.
And the last file – webcontrol.sh:
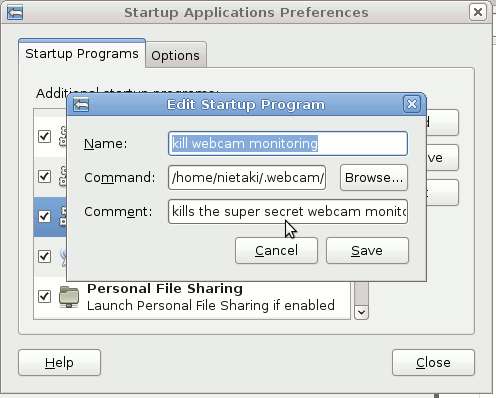
If all our .sh files have the ‘chmod +x’ for the appropriate users, the whole system should be functional by now;) One last thing we have to take care of is having our privacy protected when we ourselves log on to the computer. In Gnome you can do it by clicking through System->Preferences->Startup Applications, where you can add a new “startup program”:
And that is all! You can also make sure the “guest”‘s account our hypothetical thief would be logging onto isn’t password protected, is fully operational and has all sorts of interesting stuff on the Desktop: funny images, videoclips, porn. This way we can get more shots of the current owner of our beloved machine;).
My eee netbook has a little navy blue diode which lights up when a picture is taken, but you could easily mask it using black paint or some electrical tape.
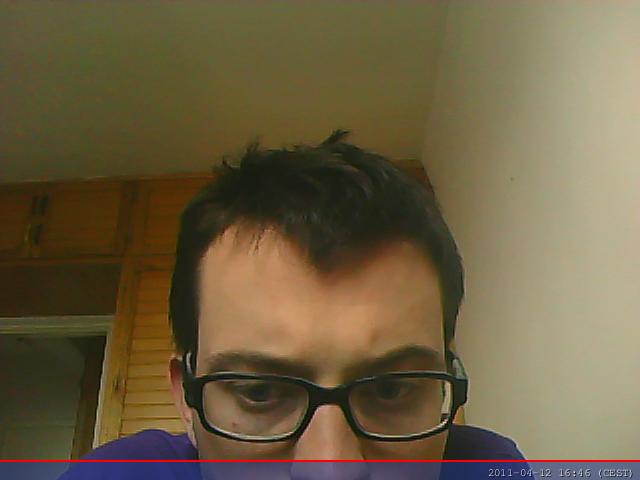
Last by not least, a sample photo taken by the script:
One thing i feel is missing from the whole setup is being able to ssh to the laptop even if it’s in somebody elses hands, behind their firewall. But right now I don’t have an idea how I can do it well…
PS. I know macs have a program that does all that and much more, but the more interesting (and cheaper) thing is to write it yourself.
PS2. If you are going to be viewing the pictures more frequently you might want to modify the script so that the pictures get a new directory every now and then – any graphical interface will be loading their previews much faster this way. But I’ll leave it as an exercise to the reader (as many of my university’s textbooks say) and leave the script in an “almost done” state ;)